
You asked for it, 2020, you got it: Plague Doctor Cookies.
Plague Doctor Cookies
These are possibly the best cookies you’ve ever had that you didn’t even know you wanted. They’re fun. They’re a great conversation starter. And they’re tasty to boot!
Of course, Plague Doctor-themed goodies may have picked up some popularity during the pandemic. But there are other times when you might just want to make a few of these to lift some spirits as well. A get-well package? A Halloween party? Or maybe your family’s own version of Crazy Cookie Night.
Plague Doctor Cookie Cutter
Anyway, all plague doctor cookies begin a plague doctor cookie cutter, so let’s get started with that. Our cookie cutter came from the notorious Mutter Museum in Philadelphia. The Mutter Museum is filled with centuries’ worth of medical oddities. If you haven’t been there – go. If you’re not close, you can order a Plague Doctor cookie cutter from their museum store.

We’ve also seen plague doctor cookie cutters on Etsy. Some of these are actual cookie cutters; some are patterns to do your own 3-D printing. Just a word of caution if you’re ordering these – Make sure you choose one (or print one) that is made from food-safe plastic.
Sugar Cookies Plus Royal Icing
To start, you’re going to bake a basic sugar cookie and use the plague doctor cookie cutter. (We baked the sugar cookie recipe right from the Mutter Museum.)
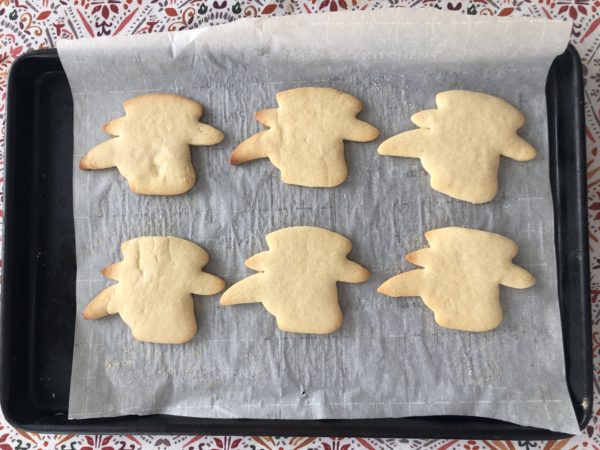
Unfrosted Plague Doctor Cookies
Next, you have to frost it with royal icing – the kind of icing that glazes over your cookie easily and then hardens. Don’t be intimidated! It’s easier to work with than you think. (We adapted this royal icing very slightly from Sally’s Baking Addiction.)
Plague Doctor Cookie Recipe
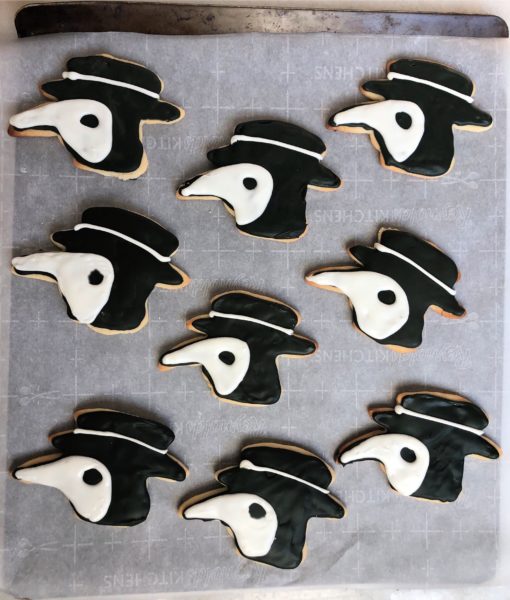
Plague Doctor Cookies
Sweet sugar cookies cut out and decorated in plague doctor form.
Ingredients
For the Sugar Cookies
- 1 cup butter, softened
- 2/3 cup sugar
- 1 tsp vanilla extract
- 1/2 tsp salt
- 2 1/2 cups all-purpose flour, sifted
For the Royal Black Icing
- 2 cups powdered sugar, sifted
- 1 1/2 tbsp meringue powder
- 4 tbsp room temperature water
- 10 to 12 drops black food coloring
For the Royal White Icing
- 1 cup powdered sugar, sifted
- 3/4 tbsp meringue powder
- 2 to 3 tbsp room temperature water
Instructions
For the Cookies
-
In a mixing bowl, cream together the butter and sugar. Beat in the egg and vanilla. Add salt and flour and mix until ingredients are combined. Pat the dough into a ball, wrap it with plastic wrap or cover it carefully, and chill it for 3 to 4 hours in the refrigerator.
-
Roll the dough out on a lightly floured board to 1/4- 1/2 inch thick. Cut the shapes with the cookie cutter. Transfer cookies onto cookie sheets lined with parchment paper or silicone liners. (Optional - extra step - chill the cookies again in the refrigerator for another 30 minutes before putting them in the oven.)
-
Bake cookies at 350 degrees for 8 to 10 minutes or until lightly browned.
-
Let cookies cool completely on wire rack before frosting.
For the Royal Black Icing
-
Using the whisk attachment on your electric mixer, mix together the powdered sugar, meringue powder, and water at high speed for two minutes. Gradually add the black food coloring to get the desired shade of black. Continue mixing until food coloring is incorporated.
-
The icing should be just liquid enough to drip down from the whisk/beater into the bowl and then "pool" into the bowl (as opposed to being stiff). If it is too stiff, add more water a little at a time.
-
Scoop out a few tablespoons into a snack-sized plastic bag (preferably Ziploc or self-sealing). Snip a tiny corner off of the bag to make your icing spout. Then carefuly stream a line of icing all around the edge of your cookie.
-
Continue squeezing out icing to fill inside the lines. Then use a toothpick to smooth out the icing so there are no gaps or bubbles. If your icing is the right consistency, it should "pool" together to make a clean and glossy surface. Let the cookies sit for at least 2 hours or more to dry the first round of icing.
For the Royal White Icing
-
When the black icing layer has dried, prepare the white icing: Mix the powdered sugar, meringue powder, and water in a mixing bowl with whisk attachment at high speed for two minutes. Again, the icing should be liquid enough to drip from the whisk and then pool and look glossy when it falls into the bowl. If it is too thick, add more water; if it is too thin; add more powdered sugar.
-
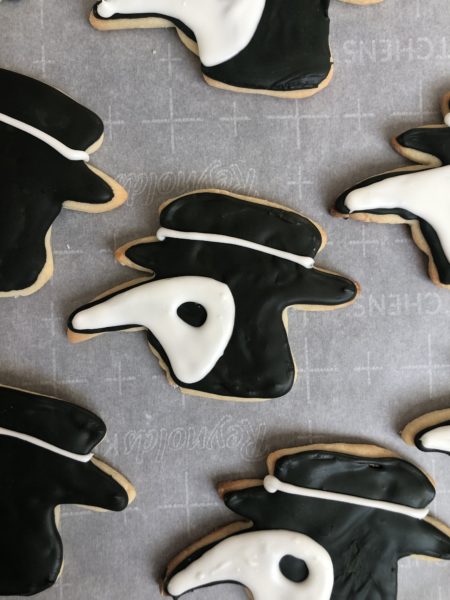
Scoop the white icing into another snack-sized plastic bag. Seal the bag and cut a tiny hole in one corner of the bag. Carefully squeeze one line of icing to make the brim of the hat. Then squeeze the outline of the mask face (as shown), leaving a hole for the eye. Fill in the mask and use a toothpick to smooth out the white mask face, making sure to leave a hole in the cener for the eye.
-
Let the icing harden for at least 2 hours before plating and presenting. Serves 10 (approximately two cookies apiece, depending on the size of your cookie cutter.)
Frost Cookies with Royal Icing
When it’s time to frost your cookies, you may feel like using a store-bought can of frosting and calling it a day. But to get that clean look, you’re really going to want to make it with royal icing. Don’t worry. Take a deep breath and tell yourself that you can do it.
If you don’t have the right frosting piping bag, (I don’t), you can just use a Ziploc baggie. Cut off a tiny corner of the bag and that becomes your little piping spout. The corner that you cut off should be tiny, like 1/2 centimeter, so that the resulting opening is only just a little stream of piping. Last but not least, make sure the bag is zipped up tight – and you’re ready to go.
To start, pipe a black line evenly all along the outside of the cookie.
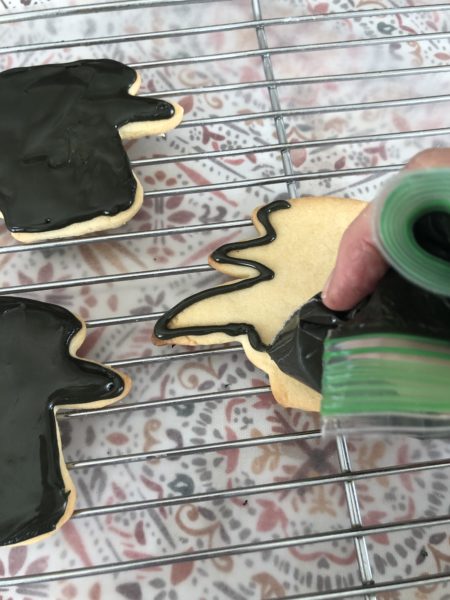
Begin by piping a thin line of icing around the edge of the cookie
Then pipe a blob of frosting inside the lines. Next, use a toothpick to smooth it all out and bring the frosting out to the edge of the piped line. Finally, tap the toothpick to pop any bubbles or smooth out any holes in the icing.
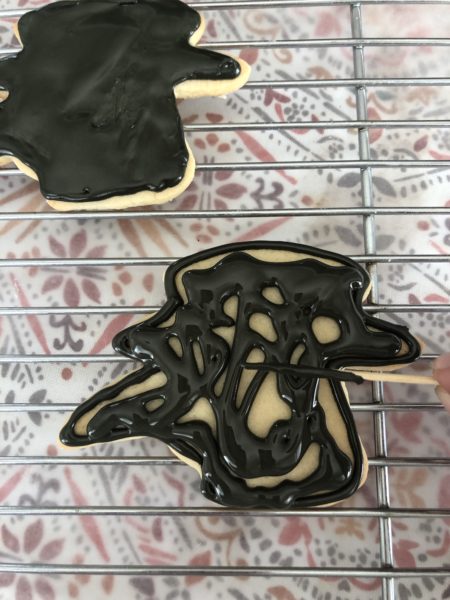
Next plop a blob of icing in between the lines, then use a toothpick to flatten it out and cover the surface.
If your icing is the right consistency, it should smooth out into a little glassy pool over your cookies. If it looks like it’s getting stiff or sticky, re-blend it with a little bit of water. Make sure you allow plenty of time for the black layer of icing to dry.
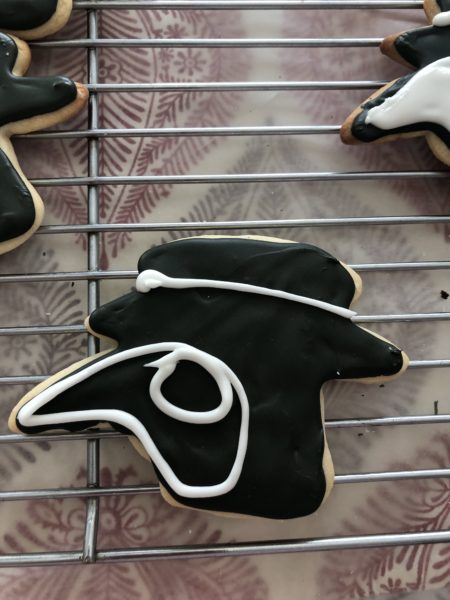
Next it’s time for the white icing. To start, you need to make a line for the brim of the hat, and an outline of the face portion of the mask:
And then fill in the face portion of the mask with white icing and again blend it with a toothpick.
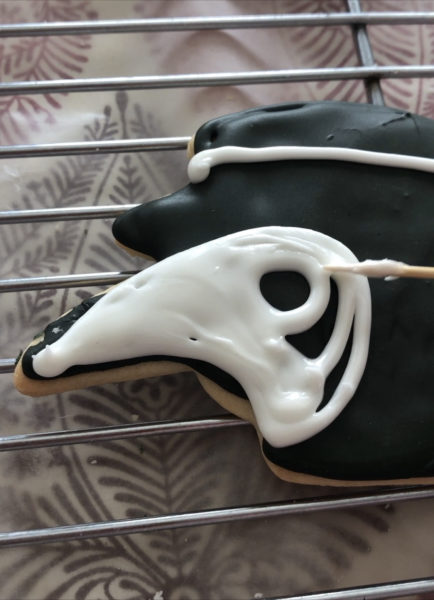
Filling in the white icing with a toothpick
Last but not least, you let the icing smooth, and settle, and firm up. And then, enjoy them… from the fun conversation they start, all the way down to the last tasty bite.
Blogger disclosure: This post contains links to items in our Amazon affiliate account. If you purchase through these links, JollyTomato earns a small commission at no cost to you.
 Hi! I'm Jeanne Fratello - a writer, reporter, and food enthusiast who is on a mission to write great stories about food and where your food comes from.
No comments yet.